Create and test DAST projects for web applications and APIs

To run dynamic tests on a web application or API, you first need to create a DAST project in Polaris. Configure the basic settings—including the entry-point URL, target type, allowed hosts, and authentication method—and then create the DAST project and profile. You can then run DAST tests from the Tests area of the Polaris user interface.

Prerequisites

Before you begin, make sure that:

  • Your organization has a subscription with a DAST entitlement.
  • Your subscription has at least one available DAST project.
  • An Organization Admin or Organization Application Manager has either:
  • Polaris has network access to the web application or API you wish to scan. To run DAST tests, Polaris communicates with your Internet-accessible applications or APIs using IPs that vary between Polaris instances.
    Table 1. fAST Dynamic (DAST) IPs
    Polaris instance IPs (outbound)
    America, production
    • 192.231.134.0/24
    America, POC
    European Union, production
    • 162.244.5.0/24
  • To scan internal web applications or APIs (inside a private network), you must install the Black Duck Bridge CLI (version 3.1.0 or higher). For more details, see Test internal DAST projects with Polaris Secure Tunnel.
  • You have permissions to create and manage projects.
    Note: See Roles and permissions for more information.

Create a DAST project

You can create DAST projects for two types of targets:
  • Web applications
  • APIs

A target is identified by its Entry Point URL and can be Internet-accessible or internal (inside a private network). A separate DAST profile is needed for each target you want to scan using fAST Dynamic. A single DAST project can be used for testing a web application or an API target, but not both.

Create a DAST project for a web application target

To create a DAST project for a web application target, follow these steps:
  1. Select Portfolio on the left sidebar.
  2. Select an application with a DAST subscription.
  3. On the Projects tab, select + Create > New Project(s).
  4. Under Project Type, select DAST.
  5. Enter a project name (maximum length: 255 characters).
    Each project name must be unique within the organization.
  6. Enter the Entry Point URL of the web application you want to test dynamically (maximum length: 255 characters).
    When you run a DAST test on this project, fAST Dynamic will begin scanning from the URL you specify. You must have explicit permission to test the specified web application. The Entry Point URL must be:
    • The address of an Internet-accessible, pre-production web application that you have explicit permission to test. If the web application is internal, see step 7.
    • A fully-qualified domain name (FQDN), such as https://example.com/.
  7. If the web application target is internal, select the Entry Point URL is in a private network checkbox.


    After completing this task, you will need to establish a secure connection between Polaris and your private network by using the Secure Tunnel feature of the Black Duck Bridge CLI (version 3.1.0 and higher). For more information, see Test internal DAST projects with Polaris Secure Tunnel.

  8. Under Target Type, select Web Application.
  9. Enter a Profile Name for the DAST profile that will be created for this project. This must be unique within the organization.
  10. Unless you want to define advanced scan settings, leave Manually set up profile selected to use the default scan settings.
    Tip: The default DAST profile options are suitable for most use cases. If necessary, you can fine-tune your profile's settings later on. See Fine-tune a DAST profile for more information.
  11. (Optional) In the Allowed Hosts field, enter a comma-separated list of hosts—sub-domains of the Entry Point URL—to include in DAST scans. For example:
    https://app.example.com,https://auth.example.com
  12. Select a site authentication method from the Authentication dropdown. If the web application does not require authentication, or you only want fAST Dynamic to scan non-authenticated content, leave this option as None.
    Authentication Description
    Forms Forms authentication.

    Login URL (required): The URL of the web application's login page, e.g., https://example.com/sign-in

    Form Values (optional): Provide a set of site credentials using the Field Name and Value rows; for example, a username and password.

    SAML Single Sign-On (SSO) authentication through a SAML Identity Provider (IdP).

    SSO Login URL (required): The URL of your organization's SSO login page.

    Form Values (optional): Username and password to authenticate to your IdP.

    HTTP Header Values (optional): HTTP request headers as required by your SAML IDP. Enter one or more headers as name/value pairs using the Header Name and Value fields.

    Selenium Authenticate using a Selenium script (.side file), generated by using the Selenium IDE Chrome plug-in.

    Upload .side file (required): Drag and drop a .side file to the file upload box, or browse for it on your computer.

  13. (Optional) Select Perform Active Attacks to enable more intrusive testing of the target.
    Warning: If Perform Active Attacks is selected, fAST Dynamic will simulate real-world attacks by sending various inputs and then observing the application's behavior. These attacks can degrade the application, and expose sensitive data. Remember that fAST Dynamic is not designed or intended for scanning public (production) APIs, applications, and websites.
  14. (Optional) For Internet-accessible web applications only, select Test Connection to run a pre-flight connection test. You can also do this from the Tests page after creating the project and profile. This test can take a few minutes to complete and ensures that:
    • The Entry Point URL is valid.
    • Polaris can connect to the web application and authenticate, if applicable.
  15. Click Save.
Polaris creates a DAST profile to use with this project and web application target. If the target is Internet-accessible, you can now run a DAST test against the project. If the target is internal, you first need to establish a secure tunnel between Polaris and your private network by using the Secure Tunnel feature of the Black Duck Bridge CLI. For more information, see Test internal DAST projects with Polaris Secure Tunnel.

Create a DAST project for an API target

To create a DAST project for an API target, follow these steps:
  1. Select Portfolio on the left sidebar.
  2. Select an application with a DAST subscription.
  3. On the Projects tab, select + Create > New Project(s).
  4. Under Project Type, select DAST.
  5. Enter a project name (maximum length: 255 characters).
    Each project name must be unique within the organization.
  6. In the Entry Point URL field, enter the address of the API you want to test dynamically (maximum length: 255 characters).
    • Specify the base URL of an Internet-accessible, pre-production API that you have explicit permission to test. For example: https://api.altoroj.tinfoilsecurity.com/v2
    • The scanner can only reach endpoints that are accessible from the base URL.
    • Remember to specify the API version in the URL path, if the API is versioned.
    • If the API is internal, see step LINK.
  7. If the API is internal, select the Entry Point URL is in a private network checkbox.


    After completing this task, you will need to establish a secure connection between Polaris and your private network by using the Secure Tunnel feature of the Black Duck Bridge CLI (version 3.1.0 and higher). For more information, see Test internal DAST projects with Polaris Secure Tunnel.

  8. Under Target Type, select API.
  9. Enter a Profile Name for the DAST profile that will be created for this project. This must be unique within the organization.
  10. Unless you want to define advanced scan settings, leave Manually set up profile selected to use the default scan settings.
    Tip: The default DAST profile options are suitable for most use cases. If necessary, you can fine-tune your profile's settings later on. See Fine-tune a DAST profile for more information.
  11. (Optional) In the Allowed Hosts box, enter a comma-separated list of hosts—sub-domains of the Entry Point URL—to include in DAST scans. For example:
    https://api.altoroj.tinfoilsecurity.com/v2/auth
  12. Select the format of your API specification file from the API Specification Type dropdown. The supported file formats are as follows:
    • OpenAPI / Swagger Specification (.yml, . yaml, .json) (default)
    • Postman Collection (.json)
    • HTTP Archive file (.har)
    • GraphQL SDL (.sdl)
  13. Provide a supported API specification file for the API you specified in step 6.
    Method Steps
    Upload an API specification file manually
    1. Select Upload API Specification File.
    2. Drag and drop a file of the chosen type to the Upload API Spec box. You can also upload a local file.
    Link to an API specification file hosted on the Internet
    Note: This option is supported for OpenAPI / Swagger Specification files only.
    1. Select API Specification File URL.
    2. Enter the URL where the API specification file is hosted, for example: https://api.altoroj.tinfoilsecurity.com/v2/swagger.json
  14. (Optional) Select Perform Active Attacks to enable more intrusive testing of the API.
    Warning: If Perform Active Attacks is selected, fAST Dynamic will simulate real-world attacks by sending various inputs and then observing the API's behavior. These attacks can degrade the application, and expose sensitive data. Remember that fAST Dynamic is not designed or intended for scanning public (production) APIs, applications, and websites.
  15. Select the Authentication method for the API. The following are the authentication methods Polaris supports:
    Authentication Description
    None (default) No authentication. Clients can query the API without providing credentials or an API key.
    Headers Authorization headers. To query the API, clients must provide credentials or an API key stored in one or more HTTP authorization headers.
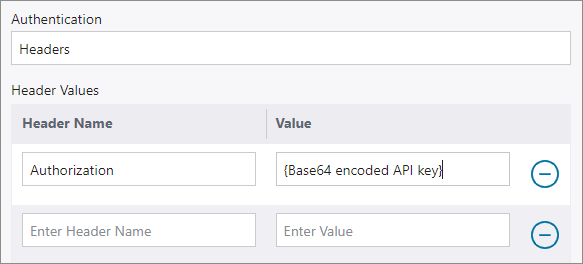
  16. If you selected Headers, the Header Values table is displayed. Provide the required headers as key-value pairs in the Header Name and Value columns. You can provide any type of header, though these options are intended for authorization headers. For example:

    An example authorization header in the Header Values table.
  17. (Optional) For Internet-accessible APIs only, select Test Connection to run a pre-flight connection test. You can also do this from the Tests page after creating the project and profile. This test can take a few minutes to complete and ensures that:
    • The Entry Point URL is valid.
    • Polaris can connect to the API and authenticate, if applicable.
  18. Click Save.
Polaris creates a DAST profile to use with this project and API target. If the target is Internet-accessible, you can now run a DAST test against the project. If the target is internal, you first need to establish a secure tunnel between Polaris and your private network by using the Secure Tunnel feature of the Black Duck Bridge CLI. For more information, see Test internal DAST projects with Polaris Secure Tunnel.

Test a DAST project

Follow these steps to run a DAST test from the Polaris user interface:

  1. There's more than one way to start this procedure:
    • Go to Portfolio, select an application, click the icon at the end of the project's row, and select New Test.
    • Go to Tests and select New Test.
  2. Select the DAST profile to scan with the Application and Project dropdown menus.


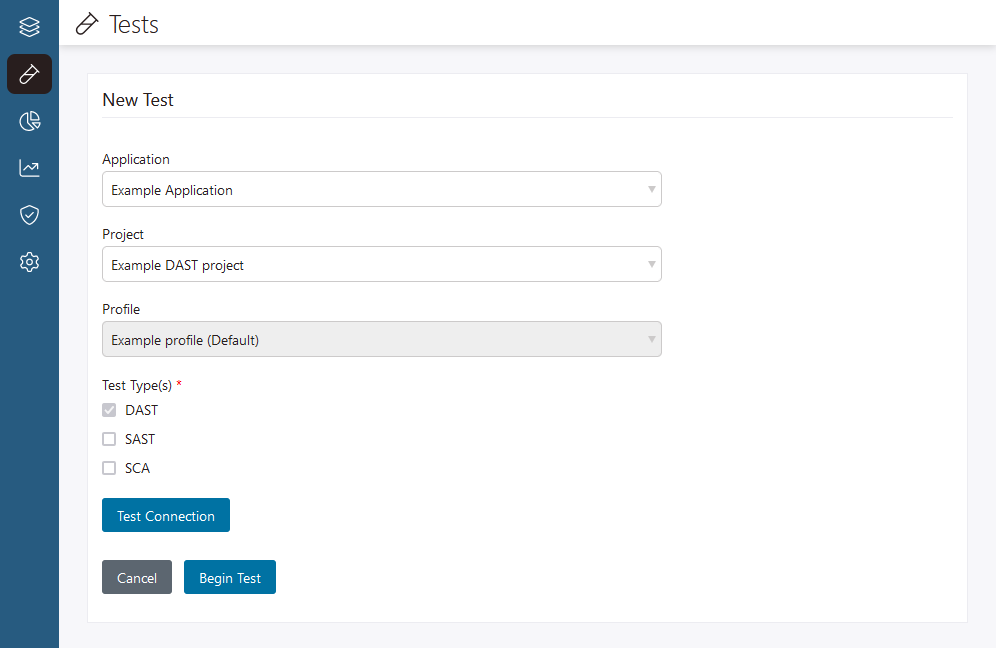
    Note: Depending on how you start a test, the Application, Project, and Profile values may already be filled in.
  3. (Optional) Select Test Connection.
    This test can take a few minutes to complete and ensures:
    • The Entry Point URL is valid.
    • Polaris can connect to the web application.
    • Polaris can authenticate with the web application.
  4. Select Begin Test.
Monitor test progress on the Tests page (accessible from the left-hand navbar). Newer tests appear near the top of the page. Filter tests by date, type, mode, status, and the application, project, or branch/profile tested.